


简介
nacos (Dynamic Naming And Configuration Service ) 是阿里旗下的一个开源框架 ,前四个字母分别是 Naming 和 Configuration 的前两个字母 最后的 s 指 Service。 根据nacos官网描述 : Nacos 致力于帮助您发现、配置和管理微服务。Nacos 提供了一组简单易用的特性集,帮助您快速实现动态服务发现、服务配置、服务元数据及流量管理。nacos = Eureka + Config + Bus, 本文章这次主要讲解进行Configuration的配置。
服务端启动
从github下载所需要的的service版本, nacos的部署分为三种模式:
- 单机模式 - 用于测试和单机试用。
- 集群模式 - 用于生产环境,确保高可用。
- 多集群模式 - 用于多数据中心场景。
这次采用单机模式, 在0.7版本之前,在单机模式时nacos使用嵌入式数据库实现数据的存储,不方便观察数据存储的基本情况。0.7版本增加了支持mysql数据源能力,具体的操作步骤:
- 1.安装数据库,版本要求:5.6.5+
- 2.初始化mysql数据库,数据库初始化文件:nacos-mysql.sql
- 3.修改conf/application.properties文件,增加支持mysql数据源配置(目前只支持mysql),添加mysql数据源的url、用户名和密码。
#*************** Config Module Related Configurations ***************#
### If use MySQL as datasource:
spring.datasource.platform=mysql

### Count of DB:
db.num=1

### Connect URL of DB:
db.url.0=jdbc:mysql://127.0.0.1:3306/nacos?characterEncoding=utf8&connectTimeout=1000&socketTimeout=3000&autoReconnect=true&useUnicode=true&useSSL=false&serverTimezone=UTC
db.user.0=root
db.password.0=root
connectTimeout、socketTimeout 、useSSL 等 可根据自身情况进行修改, 进入到bin 目录下以单机模式启动server sh startup.sh -m standalone
在浏览器键入URL, http://localhost:8848/nacos/ 用户名和密码都是nacos, 端口号是珠穆朗玛峰的高度

Java客户端
maven依赖引入
<dependency>
    <groupId>com.alibaba.cloud</groupId>
    <artifactId>spring-cloud-starter-alibaba-nacos-config</artifactId>
</dependency>
配置文件
配置文件的加载的优先级bootstrap的优先级高于application
spring:
  application:
    name: nacos-config
  profiles:
    active: dev
  cloud:
    nacos:
      config:
        server-addr: 127.0.0.1:8848
        file-extension: properties
        group: DEV_GROUP
        namespace: 41423500-0b3a-45de-8ee5-08b44f0733d9
server-addr: 就是 nacos的服务端地址
file-extension: 是dateId 组成的一部分, 以前只能指定为properties yaml yml三种 现在又加上json html xml格式
group: 所属的组, 取到对应配置的因素之一 默认为DEFAULT_GROUP
namespace: 命名空间, 取到对应配置的因素之一 默认为"", 前台创建完后将生成的UUID拷贝回来
profiles.active: 进行环境的区分, 比如 生产还是测试
dataId的组成: ${spring.application.name}-${spring.profile.active}.${spring.cloud.nacos.config.file-extension}
dataId 优先级:
${spring.application.name}-${spring.profile.active}.${spring.cloud.nacos.config.file-extension} 全称最高
${spring.application.name}.${spring.cloud.nacos.config.file-extension} 次之
${spring.application.name} 最低
从低到高找, 高优先级覆盖低优先级
直接去nacos service前台创建一个 dataId为: nacos-config-dev.properties的高优先级配置数据
Java代码
@RestController
@RefreshScope
public class SampleController {

    @Value("${user.name}")
    String userName;

    @Value("${user.age}")
    int age;

    @GetMapping("/getUser")
    public String getUserName() {
        return userName + " " + age;
    }
}
@RefreshScope 用来实现环境变量的动态刷新
前台数据配置
需要在命名空间为 dev 下创建一个dataId为 nacos-config-dev.properties group为DEV_GROUP, 包含 user.name 和 user.age 的配置
命名空间在这里进行创建
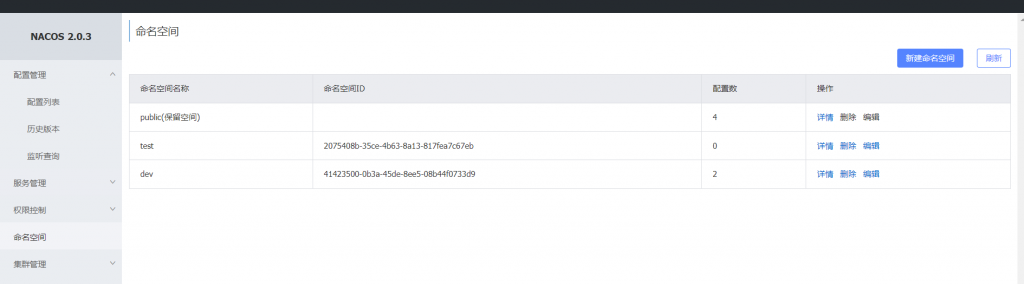
在dev命名空间下创建对应的数据项
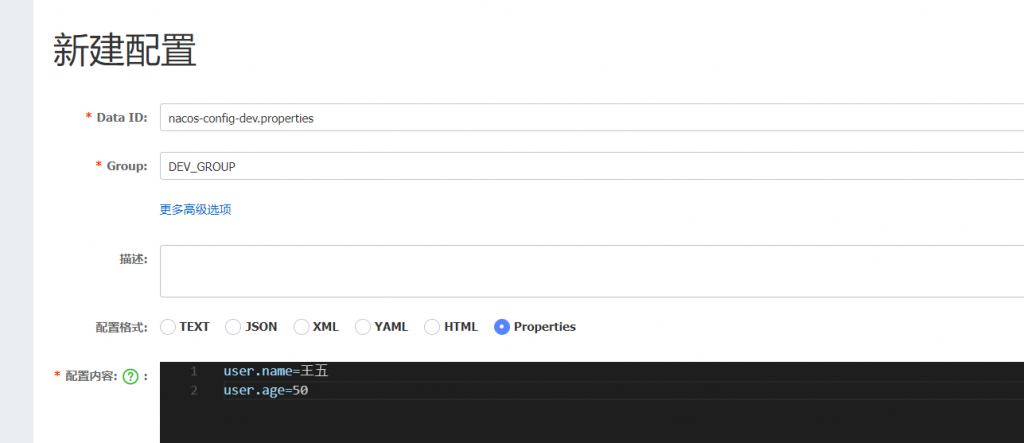
这里选择的配置格式要与配置项配置的一致
创建完成后, 会在config_info 表中新增一条数据, 就是刚刚在界面上创建的数据
his_config_info表存放对配置的操作的历史记录, 进行对比
tenant_info 存放创建的namespace
config_info_beta 存放beta 发布的数据
环境启动时配置项加载流程
config主要起始类NacosConfigAutoConfiguration和NacosConfigBootstrapConfiguration
NacosConfigAutoConfiguration 创建了五个Bean, NacosConfigProperties、NacosRefreshProperties、NacosRefreshHistory、NacosConfigManager、NacosContextRefresher
NacosConfigBootstrapConfiguration主要创建Bean NacosPropertySourceLocator, NacosPropertySourceLocator 实现了 PropertySourceLocator从而实现环境变量的加载 , 主要方法为locate。
public PropertySource<?> locate(Environment env) {
		nacosConfigProperties.setEnvironment(env);
		ConfigService configService = nacosConfigManager.getConfigService();

		if (null == configService) {
			log.warn("no instance of config service found, can't load config from nacos");
			return null;
		}
		long timeout = nacosConfigProperties.getTimeout();
		nacosPropertySourceBuilder = new NacosPropertySourceBuilder(configService,
				timeout);
		String name = nacosConfigProperties.getName();

		String dataIdPrefix = nacosConfigProperties.getPrefix();
		if (StringUtils.isEmpty(dataIdPrefix)) {
			dataIdPrefix = name;
		}

		if (StringUtils.isEmpty(dataIdPrefix)) {
			dataIdPrefix = env.getProperty("spring.application.name");
		}

		CompositePropertySource composite = new CompositePropertySource(
				NACOS_PROPERTY_SOURCE_NAME);

		loadSharedConfiguration(composite);
		loadExtConfiguration(composite);
		loadApplicationConfiguration(composite, dataIdPrefix, nacosConfigProperties, env);
		return composite;
	}
先获取nacos的自身配置信息,
创建NacosPropertySourceBuilder对象
组装dataId
loadSharedConfiguration 需要在nacos配置中配置shared-configs 否则空过
loadExtConfiguration 需要在nacos配置中配置 extension-configs 否则空过
loadApplicationConfiguration 主要方法, 用来获取nacos server 配置的环境变量
private void loadApplicationConfiguration(
			CompositePropertySource compositePropertySource, String dataIdPrefix,
			NacosConfigProperties properties, Environment environment) {
		String fileExtension = properties.getFileExtension();
		String nacosGroup = properties.getGroup();
		// load directly once by default
		loadNacosDataIfPresent(compositePropertySource, dataIdPrefix, nacosGroup,
				fileExtension, true);
		// load with suffix, which have a higher priority than the default
		loadNacosDataIfPresent(compositePropertySource,
				dataIdPrefix + DOT + fileExtension, nacosGroup, fileExtension, true);
		// Loaded with profile, which have a higher priority than the suffix
		for (String profile : environment.getActiveProfiles()) {
			String dataId = dataIdPrefix + SEP1 + profile + DOT + fileExtension;
			loadNacosDataIfPresent(compositePropertySource, dataId, nacosGroup,
					fileExtension, true);
		}

	}
获取文件扩展名 fileExtension 和分组 nacos Group
这里 loadNacosDataIfPresent 方法执行了三次, 传入了三次不同的dataID, 这个在上面提到过
第一次 用dataId 为 ${spring.application.name}
第二次 用dataId 为 ${spring.application.name}.${spring.cloud.nacos.config.file-extension}
第三次 用dataId 为 ${spring.application.name}-${spring.profile.active}.${spring.cloud.nacos.config.file-extension}
后续调用了 com.alibaba.cloud.nacos.client.NacosPropertySourceLocator#loadNacosDataIfPresent
com.alibaba.cloud.nacos.client.NacosPropertySourceLocator#loadNacosPropertySource
com.alibaba.cloud.nacos.client.NacosPropertySourceBuilder#build
com.alibaba.cloud.nacos.client.NacosPropertySourceBuilder#loadNacosData
private List<PropertySource<?>> loadNacosData(String dataId, String group,
			String fileExtension) {
		String data = null;
		try {
			data = configService.getConfig(dataId, group, timeout);
			if (StringUtils.isEmpty(data)) {
				log.warn(
						"Ignore the empty nacos configuration and get it based on dataId[{}] & group[{}]",
						dataId, group);
				return Collections.emptyList();
			}
			if (log.isDebugEnabled()) {
				log.debug(String.format(
						"Loading nacos data, dataId: '%s', group: '%s', data: %s", dataId,
						group, data));
			}
			return NacosDataParserHandler.getInstance().parseNacosData(dataId, data,
					fileExtension);
		}
		catch (NacosException e) {
			log.error("get data from Nacos error,dataId:{} ", dataId, e);
		}
		catch (Exception e) {
			log.error("parse data from Nacos error,dataId:{},data:{}", dataId, data, e);
		}
		return Collections.emptyList();
	}
getConfig获取环境变量时会先获取本地配置, 加载保存的快照文件:
- 第一次启动无快照文件, 会从server端dataId、group、namespace 获取到对应的配置, 拉取到后保存快照文件, 方便下一次使用, 无需每次请求server端
- 有的话则读取快照文件
- server端更新过配置后, 会重新修改快照文件, 更新成最新的。如果配置了@RefreshScope 注解, 则会将原先的旧bean销毁, 并在下次使用时创建个新bean, 从而保证bean中的配置为最新的, 下面会详细说到
获取完配置后进行解析配置项com.alibaba.cloud.nacos.parser.NacosDataParserHandler#parseNacosData

根据配置的 fileExtension 来进行配置项的解析, 从而将其装配到Bean的属性中
RefreshScope
先看下RefreshScope注解, 是一个定制化的Scope注解, scope的名字叫做 refresh, 代理模式为 TARGET_CLASS
@Target({ ElementType.TYPE, ElementType.METHOD })
@Retention(RetentionPolicy.RUNTIME)
@Scope("refresh")
@Documented
public @interface RefreshScope {

	/**
	 * @see Scope#proxyMode()
	 * @return proxy mode
	 */
	ScopedProxyMode proxyMode() default ScopedProxyMode.TARGET_CLASS;

}- DEFAULT 不使用代理
- No 不使用代理
- INTERFACES 使用基于接口的代理 (jdk dymaic proxy)
- TARGET_CLASS 使用基于类的代理(cglib)
打上注解后, 会将该Bean的创建交给org.springframework.cloud.context.scope.refresh.RefreshScope 来进行创建个代理对象, 该类继承GenericScope
监听Listen的注册
nacos 客户端会根据dataId 和 group 注册一个监听com.alibaba.cloud.nacos.refresh.NacosContextRefresher#registerNacosListener
定时任务启动
客户端启动时会 启动一个延迟定时任务com.alibaba.nacos.client.config.impl.ClientWorker.LongPollingRunnable
executor.scheduleWithFixedDelay(new Runnable() {
            @Override
            public void run() {
                try {
                    checkConfigInfo();
                } catch (Throwable e) {
                    LOGGER.error("[" + agent.getName() + "] [sub-check] rotate check error", e);
                }
            }
        }, 1L, 10L, TimeUnit.MILLISECONDS);
每10毫秒进行config info 的检查, 如果检测到本地snapshot快照文件和缓存中版本不一致, 且MD5值发生了变化, 则从服务端重新拉取最新的配置信息, 然后触发listener, 执行listener中的 applicationContext.publishEvent(
new RefreshEvent(this, null, "Refresh Nacos config"));
调用 org.springframework.cloud.context.refresh.ContextRefresher#refresh
public synchronized Set<String> refresh() {
		Set<String> keys = refreshEnvironment();
		this.scope.refreshAll();
		return keys;
	}
用来刷新环境变量, 和销毁bean, 在下次使用时重新创建bean 从而实现无重启, 刷新配置项
以上就是本人对于nacos configuration的一点浅显理解, 如有错误请指正!!


Comments | 1 条评论
I was extremely pleased to discover this page. I wanted to thank you for ones time due to this fantastic read!! I definitely liked every part of it and i also have you saved as a favorite to see new stuff on your blog.